All-on-X vs All-on-4 Dental Implants in Annapolis, Understanding the Differences
Comparing Full-Arch Dental Solutions
Patients missing most or all teeth may be considering a fixed implant-supported solution. Two common options are All-on-X and All-on-4 dental implants. While both restore a full arch, the number of implants, placement strategies, and treatment plans differ slightly. Understanding these differences helps patients make informed decisions based on anatomy, goals, and lifestyle.
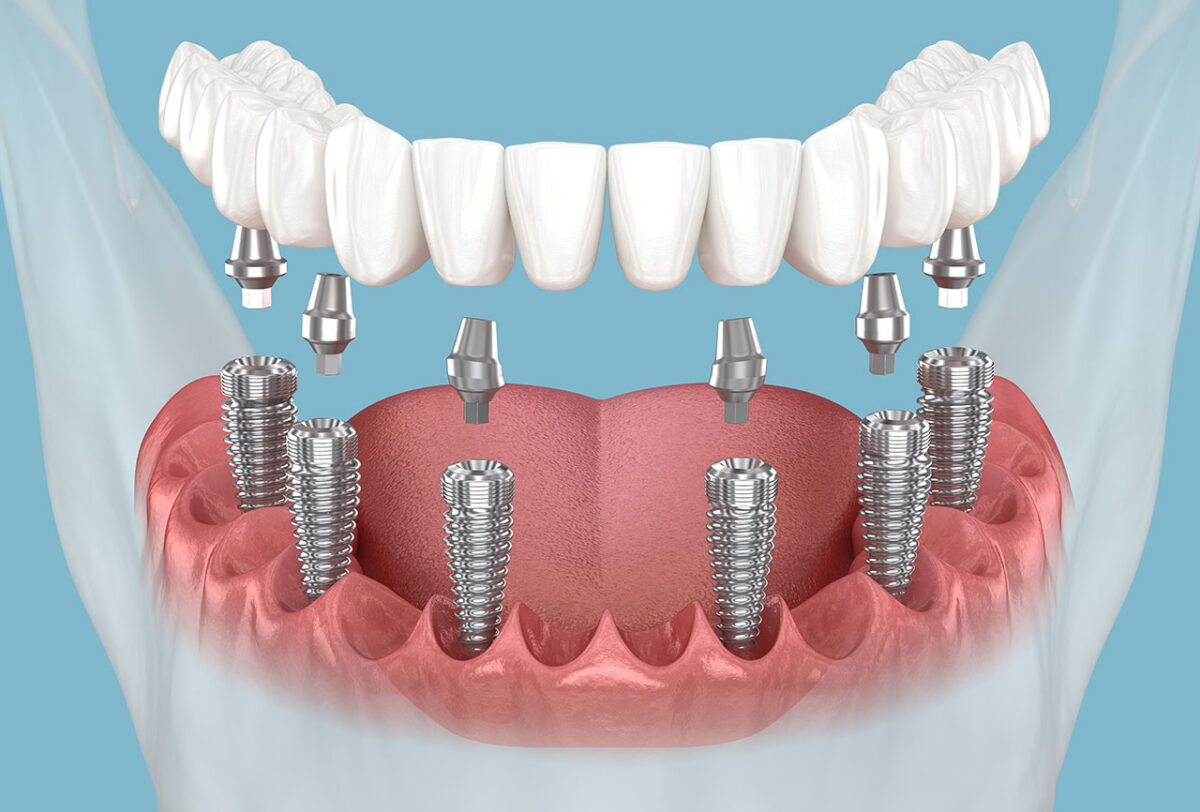
All-on-X is a broader term that refers to a full arch supported by a variable number of implants. The exact number is determined by jawbone density, bite forces, and individual needs. All-on-4 is a specific type of All-on-X where four implants support the arch. Its design maximizes stability while often avoiding additional bone grafting procedures.
How All-on-4 Works
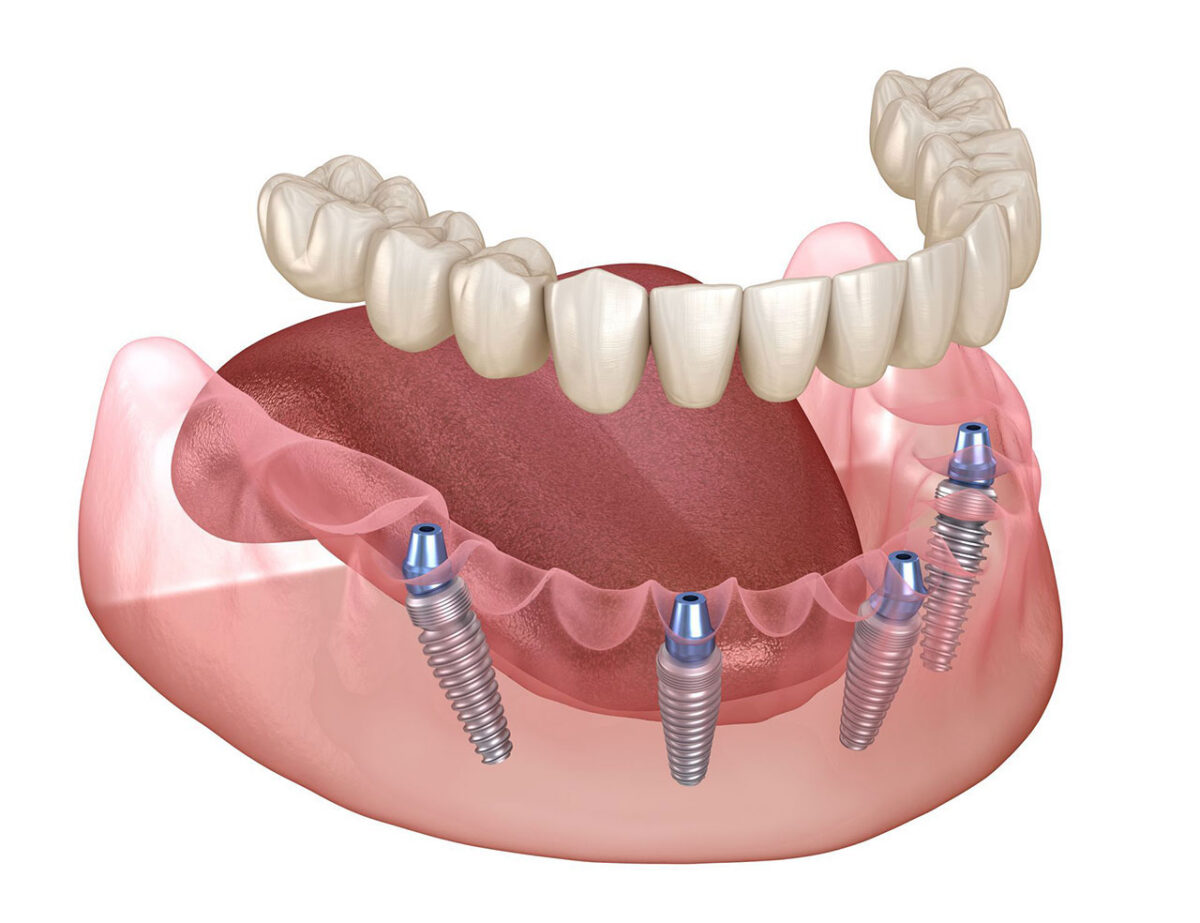
All-on-4 implants use four strategically angled posts to anchor a full arch. The posterior implants are placed at an angle to engage more bone, which reduces the need for bone grafting. A temporary prosthesis is often placed immediately, providing functional teeth while implants integrate. Once healing is complete, a final prosthesis is attached for long-term stability and aesthetics.
Who Typically Benefits
- Patients with missing or failing teeth
- Individuals with limited bone volume in the back of the jaw
- Those seeking a fixed, non-removable solution
- Patients who want a predictable treatment timeline with minimal surgery
All-on-4 is designed to be less invasive and efficient, making it a practical option for many adults.
How All-on-X Differs
All-on-X allows for a variable number of implants per arch. While the exact number may range from four to six or more, each implant supports the prosthesis and distributes bite forces evenly. The flexibility of implant number and placement allows the dentist to tailor the approach to patients with specific anatomical challenges, such as bone loss or complex bite considerations.
Advantages of More Implants
- Greater long-term stability
- Reduced stress on individual implants
- Flexibility for larger or heavier prostheses
- Options for patients with high bite forces or bruxism
All-on-X provides a customized solution when patient needs go beyond what four implants can safely support.
Treatment Planning Considerations
Both All-on-X and All-on-4 require a comprehensive evaluation. Factors include:
- Bone density and volume
- Number and location of missing teeth
- Bite alignment and jaw shape
- Patient health and habits, including smoking and systemic conditions
Digital imaging and 3D scans allow precise planning for implant placement, angulation, and prosthetic design. This ensures a predictable outcome, functional bite, and aesthetically pleasing smile.
Recovery and Healing
Both approaches involve implant surgery followed by a healing period to allow osseointegration. Patients may experience mild swelling, tenderness, or bruising in the first few days. Pain is usually manageable with over-the-counter or prescribed medication. Following a soft diet and maintaining proper oral hygiene support faster healing.
Temporary prostheses allow patients to function normally while implants integrate. Once fully healed, the final prosthesis is placed, providing strength, durability, and comfort.
Benefits of Choosing an Implant-Supported Full-Arch Solution
Full-arch dental implants restore chewing function, bite stability, and speech clarity. They preserve jawbone structure by stimulating bone through natural function, which helps maintain facial contours. Unlike removable dentures, implant-supported prostheses do not slip, reducing discomfort and improving confidence in social settings.
Patients also benefit from easier daily care, as implants are brushed and flossed similarly to natural teeth. Predictable long-term results and natural-looking restorations provide both functional and aesthetic satisfaction. Many patients report enhanced quality of life, including improved nutrition, confidence, and comfort.
Choosing Between All-on-4 and All-on-X
- All-on-4 is ideal for patients with moderate bone and a standard arch restoration need. It often allows faster treatment with fewer implants and minimal grafting.
- All-on-X is ideal for patients who need a customized approach, have high bite forces, or require additional support for a larger prosthesis.
Ultimately, the choice is made in consultation with the dentist, considering anatomy, functional needs, and aesthetic goals. Digital planning and mock-ups help patients visualize the result and select the best option.
If you are missing multiple teeth and want a long-term, functional, and natural-looking solution, a full-arch implant-supported prosthesis may be right for you. Call Aria Dental of Annapolis at (410) 280-5370 to Schedule a Consultation in Annapolis, MD.